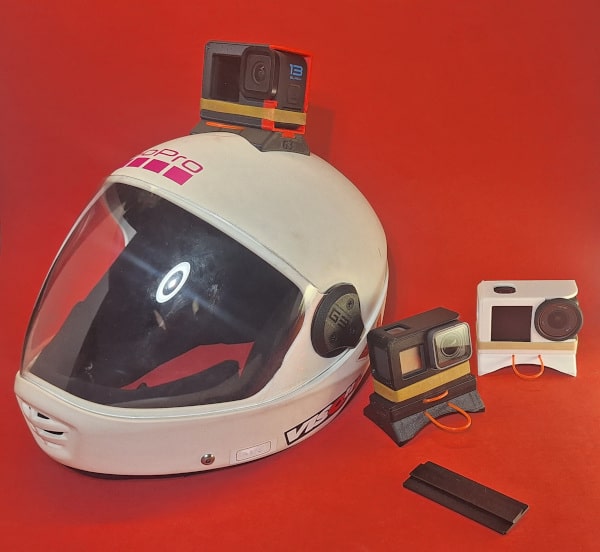
3d-printed camera mounts for skydiving
Find out about our camera mount system, it's also free!
Why another camera mount?
There are a ton of options out there when it comes to mounting your camera to your helmet.
But ours isn't just a camera mount, it's a platform.
- Everything is interchangeable: Thanks to a standard rail you can swap or upgrade cameras and accessories on the fly.
- Everything is open: We've published the platform's specs and our designs files, so you can build your own accessories or modify ours.
- Everything is free: No crazy prices, no lock-in. If you lose a part, you can reprint it or order just the part you need.
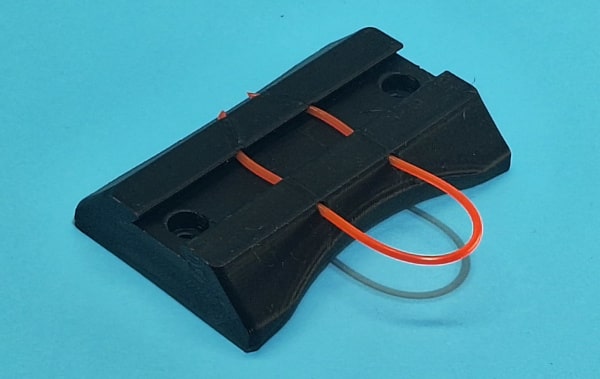
Integrated cutaway:
The same locking mechanism that holds the system together can (and should) also act as a cutaway.
To make the whole system compact and affordable we decided against using regular cutaway cable, opting instead for weed-wacker string. You can find it at any hardware store, for a very reasonable price, and one roll will last you several years of jumping. The size you want is between 1.6mm and 1.8mm (0.065 in). Do NOT use serrated, twisted, or square-profile trimmer line. Use only round, smooth monofilament nylon line.
See the next tab (Assembly) for how to cut and set it in place.
If you're stacking accessories, make the bottom one your cutaway base. Mount everything else on top of that, keeping upper accessories short and out of the way.
Important: practice cutting away before you have to!
The cutaway system uses a single line threaded through two retention holes. It's simple, light, and effective, but it requires proper technique to work as intended.
Grip firmly before pulling. If you don't, the line may only release from one hole, and the mount could stay partially attached, defeating the purpose.
Don't forget to also practice with gloves if you wear them during jumps.
Disclaimer
These models and instructions are provided as-is, with no guarantees regarding their safety, performance, or suitability for any specific use. You are solely responsible for verifying the strength, fit, and function of any printed parts before using them in a skydiving or other high-risk environment.
Flysync.io assumes no liability for damage to equipment, injury, or death resulting from the use or misuse of these designs.
Always test your setup on the ground and inspect your gear regularly. Use common sense, Blue skies.
License
All the work related to this model is licensed under Creative Commons Attribution-ShareAlike 4.0 License (CC BY-SA).
Which, in short, means:
You can print for yourself or others.
You can sell your prints (please be reasonable with the prices).
You can adapt the work in any way you want, but if you do, you are not allowed to distribute it under a more restrictive license.
You must give credit to the author, Flysync.io.
What is a standard kit made of?
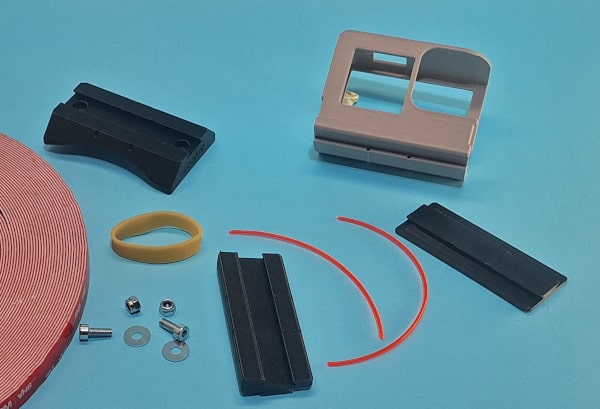
The minimum fly-able setup is composed of two items:
- a helmet adapter
- a camera holder.
You will also need:
- Some VHB tape (13mm wide),
- 2 M3x10 screws with corresponding lock nuts and washer
- Weed-wacker string (1.6-1.8mm / 0.065in)
- An elastic band (packing ones work great)
Attaching the adapter to the helmet
Pre-assemble the camera holder and helmet adapter using the rail (no need to fasten them).
Place the assembly on your helmet, with the visor open.
Adjust the position so that:
- The mount aligns flush with the open visor's edge (for correct angle).
- The mount is far enough back that if the camera holder is removed, the mount eraser can be used without blocking visor function.
Center the mount using a string or a piece of paper to measure from both sides.
Mark the location on the helmet using a pen or crayon.
Remove the padding inside of the helmet.
Using the helmet adapter as a template, mark the holes to be drilled on the helmet.
Slowly drill them. You can use masking tape to further avoid any chipping.
WARNING: Drilling your helmet may void the manufacturer's warranty and compromise its impact protection certification (e.g., EN966). FlySync provides these mounts for use at your own risk. Consult your helmet manufacturer's guidelines before modifying any safety equipment.
Screw in the helmet adapter, making sure the retention holes that are closer together are on the back, and the ones that are further apart are on the front.
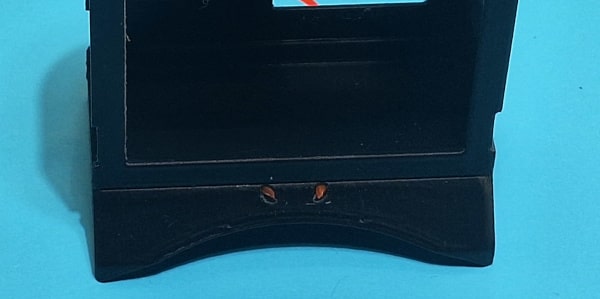
How to properly insert the cutaway string
The cutaway mechanism uses weed-wacker line passed through two retention holes.
Length:
- ~13 cm (~5 in) for a working cutaway
- ~9 cm (~3.5 in) minimum if no cutaway is needed
Preparation:
- Cut both ends of the string at an angle to ease insertion.
- Avoid any blobs or deformations at the ends.
Installation:
- Insert the string through both holes.
- The ends should be just visible from the rear but not protruding enough to catch anything.
Maintenance Tip:
- Add a visual inspection of the string to your pre-jump gear check. If it starts to come loose or stick out, remove and reinsert it.
- Carry at least one spare string in your gear bag, pre-cut to size.
- Replace the elastic band from time to time as UV damages them.
Additional accessories

10° and 20° wedges
Adjust your camera tilt.
mount eraser
Replaces the camera holder when flying without a camera (e.g., in a tunnel). Prevents snag points on the rail.
hinge (Planned)
coming soon, maybe.
Supported helmets and cameras
Here are the currently supported helmets and cameras; some more will come later.
Helmets
| Helmet | Sizes tested | Available |
|---|---|---|
| Cookie G3 | XS, S, M | ✅ |
| Cookie G3 | L, XL | ✅ |
| Cookie G4 | M, L | ✅ |
| Tonfly TFX | ✅ | |
| Tonfly TF Pro / TF link | (2.5x, 2x helmets) | ✅ |
| Kiss | M | ✅ |
| Skyhelmet | XS, S, M | ✅ |
Cameras
| Camera | Available |
|---|---|
| Go Pro 5 to 7 | ✅ |
| Go Pro 8 to 13 | ✅ |
| Go Pro Max | ✅ |
| DJI Osmo Action 5 (pro) | ✅ |
| DJI Osmo Action 6 | ✅ |
| Insta 360 One RS (and twin) | ✅ |
Files will be released when FlySync officially launches.
Printing instructions
You need to use PETG or ABS filament, you cannot use PLA as it will weaken with UV exposure and could break after a while.
Carbon fiber reinforced filaments can also be used for increased strength and rigidity. However, during testing, we found that dimensional accuracy varies significantly between brands ; and even between colors of the same brand. In modular systems like ours, where tight tolerances are essential for a reliable fit, these variations can cause issues with part compatibility.
Please dry your filament before printing for optimum results.
You want to have at least 5 walls, preferably 6 (as it makes most of the parts basically solid) printed at 0.2mm or lower layer height. Lower layer height will make your mount look better, but you also need to increase the walls to match and it will take considerably longer to print.
You want the parts to be laid on their side and printing up such that the layer lines aren't parallel to the helmet and might cause a de-lamination issue. Parts are oriented properly in their respective files.
The specs of the rail and sizes of everything will be released when FlySync launches officially as well.